Monday, 20 October 2014

How To Insert,Update And Delete The Records In Database Using LINQ

Today , i am going to Explain "How to insert,update and delete the records in database using LINQ concepts".In this concepts, i will use Data context class to perform this whole operations(insert,delete,update). You can also easily display the records with the help of Data Context class.Linq concepts are very helpful for our .net applications. Every things which you can perform in SQL Query, perform in Linq query also.The Linq query is more simplest than SQL. Here i have explained this in graphical way which is more user friendly. Any user can easily insert,update and delete the records in database.Here each User can easily see the inserted ,updated and deleted the records on your computer screen. 
There are following steps to understand the whole concepts as given below:-
Step 1:- First open SQL Server Management studio-->Create a table (student12) by run the following commands .


create table student12 (sid int primary key,name varchar(20),age int)

Note :-
  • Your table should be a primary otherwise you can't insert,update and delete the records in database.
  • You can create a table at run time using Linq but here i have not created it.If you want, you can create it. 
Step 2:-  First open your visual studio -->File -->New -->website -->Select ASP.NET Empty website -->OK --> Right click on your project(website) -->Add New Items -->Select LINQ  to SQL Classes  as shown below --> Press AddButton.


Step 3:- Now press Server Explorer --> Open your database Tables -->Drag and Drop table (student12) on Data Classes.dbml page as shown below:-

drag_table

Step 4:- Now open Solution Explorer --> Add a web form (Default.aspx) --> Drag and drop Label ,Text Box,List Box and Button controls on the page from toolbox as shown below:-


Note : -
Here each user can perform insert ,update and delete operations on web page with database.

Step 5:- Now Write the c# codes under each button (inset,update,delete) as given below:-

using System;

using System.Linq;
using System.Web;
using System.Web.UI;
using System.Web.UI.WebControls;

public partial class _Default : System.Web.UI.Page
{
    protected void Page_Load(object sender, EventArgs e)
    {
        DataClassesDataContext dc_obj = new DataClassesDataContext();
        var display_data = from st in dc_obj.student12s where st.sid >=0 select st;
        foreach(student12 st_da in display_data)
        {
            ListBox1.Items.Add(st_da.name);
        }

    }
    protected void Button1_Click(object sender, EventArgs e)
    {
        DataClassesDataContext dc_obj = new DataClassesDataContext();
        student12 obj = new student12 {sid=int.Parse(TextBox1.Text),name=TextBox2.Text,age=int.Parse(TextBox3.Text)};
        dc_obj.student12s.InsertOnSubmit(obj);
        dc_obj.SubmitChanges();
        Label1.Text = "Data inserted successfully...";
    }
    protected void Button2_Click(object sender, EventArgs e)
    {
        DataClassesDataContext dc_obj = new DataClassesDataContext();
        student12 st_obj = dc_obj.student12s.Single(s => s.sid ==int.Parse(TextBox4.Text));
        st_obj.name = TextBox5.Text;
        dc_obj.SubmitChanges();
        Label1.Text = "Successfully Updated....";
    }
    protected void Button3_Click(object sender, EventArgs e)
    {
        DataClassesDataContext dc_obj = new DataClassesDataContext();
        student12 st_obj = dc_obj.student12s.Single(s => s.sid == int.Parse(TextBox6.Text));
        dc_obj.student12s.DeleteOnSubmit(st_obj);
        dc_obj.SubmitChanges();
        Label1.Text = "Successfully Deleted....";
    }
}

Step 6:- Now Run the Application (Press F5)-->Enter the required field details and press insert ,update and delete operations respectively-->You will see the following output as shown below:-

output

 Note:-
  • You can use this concepts in your any asp.net application.
  • You can Run this whole on your Visual studio without facing any problem.
I hope this is helpful to you.


Friday, 17 October 2014

How To Use Conversion Operators With Linq Query

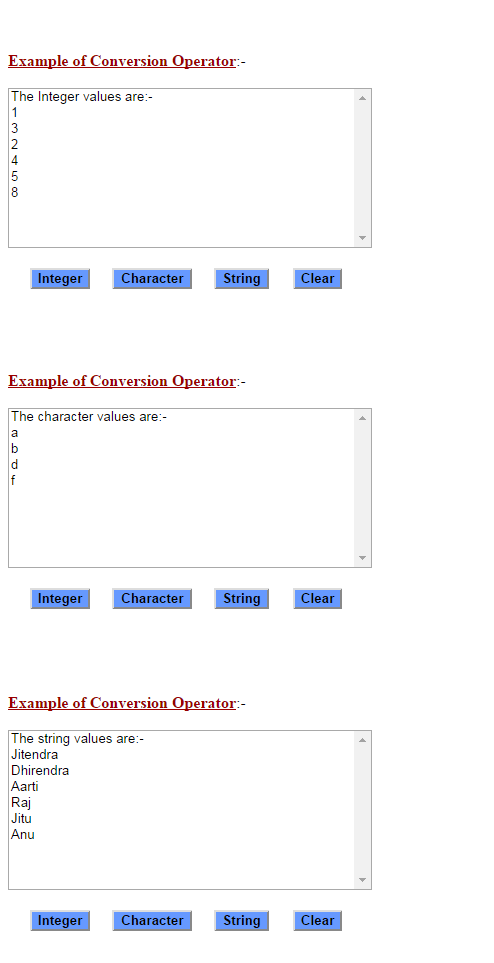
The conversion operators are used to change the type of input objects.This provide a simple and convenient way for converting sequences to other collection types.In this tutorial ,we will learn about the ToList conversion operators.This is very help when you want to differentiate the different data types (int,char,string ,etc.) according to you(customer). This concepts will help you to do it.If you want to display each data type's data one by one in your application then it is more helpful to you.Please read it very care fully and use it in your application according to your goal.
There are some steps to implement this concepts in .net application as given below.  
Step 1:- First open your visual studio -->File -->New --> Select ASP.NET Empty website -->OK -->open solution Explorer --> Add New Web form (home.aspx) --> drag and drop List Box and button controls on the web page from toolbox as shown below:-


Step 2:- Now Write write the following c# codes on button clicks (home.aspx.cs) as given below:-

using System;
using System.Collections.Generic;
using System.Linq;
using System.Web;
using System.Web.UI;
using System.Web.UI.WebControls;

public partial class home : System.Web.UI.Page
{
    protected void Page_Load(object sender, EventArgs e)
    {

    }
    object[] list = { "Jitendra", 1,'a', "Dhirendra", 3,'b', 2, "Aarti", 4, "Raj",'d','f', "Jitu", 5,"Anu",8 };
    protected void Button1_Click(object sender, EventArgs e)
    {
        var n = list.OfType<int>();
        ListBox1.Items.Add("The Integer values are:-");
        foreach (var int_num in n)
        {
            ListBox1.Items.Add(int_num.ToString());
        }

    }
    protected void Button2_Click(object sender, EventArgs e)
    {
        var m = list.OfType<char>();
        ListBox1.Items.Add("The character values are:-");
        foreach (var char_num in m)
        {
            ListBox1.Items.Add(char_num.ToString());
        }
    }
    protected void Button3_Click(object sender, EventArgs e)
    {
        var p = list.OfType<string>();
        ListBox1.Items.Add("The string values are:-");
        foreach (var str_num in p)
        {
            ListBox1.Items.Add(str_num);
        }
    }
    protected void Button4_Click(object sender, EventArgs e)
    {
        ListBox1.Items.Clear();
    }
}


Step 3:- Now Run the Application (Press F5) --> you will see the following output as shown below:-


How To Create Setup File(.Exe) With Database In Visual Studio 2010

Today,I am going to show how to create setup file(.exe) with SQL Database in visual studio 2010.Remember one things ,when you install this setup to your desktop ,first install .NET Framework 4.0 or 4.5 in  your machine otherwise it will give error.

There are some steps to create setup file with SQL Database, which are given below:
Step 1 : First open your visual studio -->File -->New-->Project-->Select Windows Forms Application -->OK-->and drag and drop Label,TextBox & Button control on the Form from toolbox as shown below:


Step 2 : Now open Solution Explorer -->Right Click on project-->Add-->New Items-->Service-based Database-->Click Add.


Step 3 : Now Double click on Database.mdf file-->Add New Table as shown below:


Step 4 : Now Enter your table column name-->and press save button as shown below:


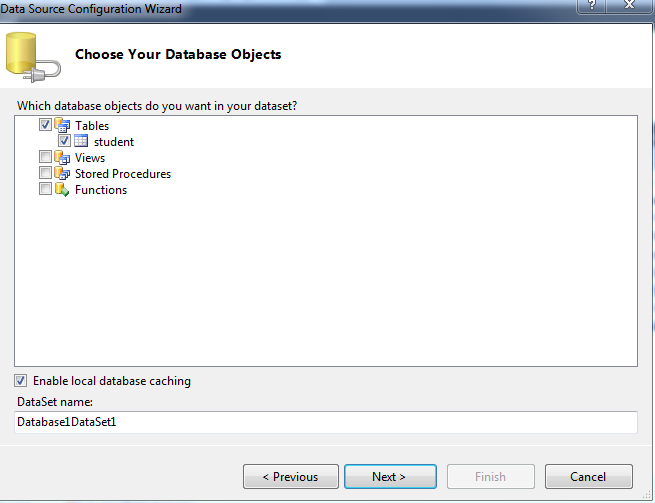
Step 5 : Now go left window of your visual studio-->click Data sources (if not available then click  Data Button on top-->Click show Data sources)-->Add New Data source --> Select Data Source -->Next-->Select Dataset -->Next-->Choose connection string -->Next


Now continue with Next Button then you will see as shown below-->Next.


Step 6 :  Now open Solution Explorer -->Add New Web Form --> drag and dropDataGridView control from toolbox-->and configure it as before.


Step 7 : Now open Solution Explore-->Right Click on Project -->Add New Reference-->.NET --> add Two Namespace as given below-->OK
  • System.Configuration
  • System.Configuration.install

    Step 8 : Now Double Click on Submit and Show Table Data Button and write the following codes as given below.

    using System;
    using System.ComponentModel;
    using System.Data;
    using System.Drawing;
    using System.Windows.Forms;
    using System.Data.SqlClient;
    using System.Configuration;
    namespace winsetup
    {
        public partial class Form1 : Form
        {
            public Form1()
            {
                InitializeComponent();
            }

            private void button1_Click(object sender, EventArgs e)
            {
                SqlConnection con = new SqlConnection(ConfigurationManager.ConnectionStrings["newConnectionString"].ConnectionString);
                con.Open();
                String str = "insert into student(Name,mobile,city) values('" + textBox1.Text + "','" + textBox2.Text + "','" + textBox3.Text + "')";
                SqlCommand cmd = new SqlCommand(str, con);
                cmd.ExecuteNonQuery();
                con.Close();
                label4.Text = "Data has been successfully inserted";
            }
            private void button2_Click(object sender, EventArgs e)
            {
                Form2 frm2 = new Form2();
                this.Hide();
                frm2.Show();
            }
        }
    }


    Step 9 :  Now open App.config file from Solution Explorer --> change name and add same code in your connection code as shown below:


    Note:- Now i am going to create setup file with SQL Database as shown  below . 

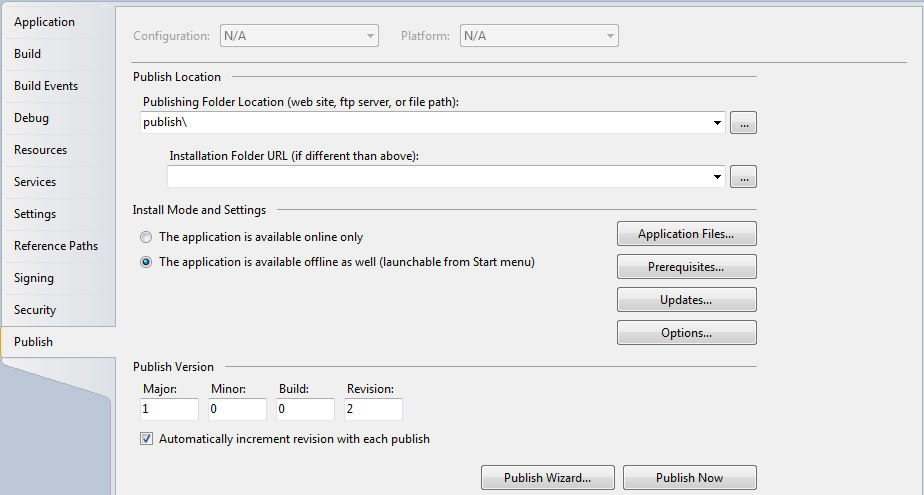
    Step 10 :  Now open Solution Explorer -->Right click on the project -->Properties -->clickpublish Button From left window as shown below:


    Step 11 : Now First Create New folder (mysetup) on your Desktop .

    Step 12 : Now Click Publishing Folder Location --> Select Your Folder(mysetup) from Desktop as shown below-->click Open.


    Step 13 : Now click Prerequisites Button-->Select following options as shown below-->OK.


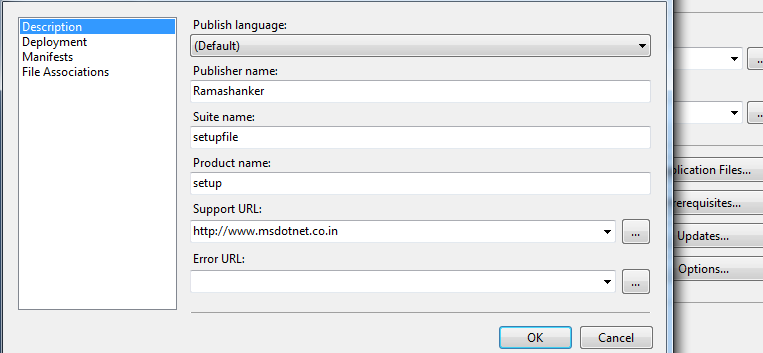
    Step 14 : Now click Options -->Write the required field as shown below-->OK


    Step 15 : Now click Publish Wizard.. from bottom --> click Next as shown below.


    Step 16 : Now proceed with Next Button --> click  Finish .


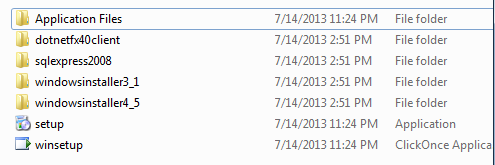
    Step 17 : Now click Publish Now  Button from Bottom --> Your setup will be created in your Desktop folder (mysetup).
    see it:


    Step 18 : Now First install .NET Framework 4.0 or 4.5 in your system,If you are using visual studio 2010 or 2012.After that you can install this setup.It will take few minutes.

    Step 19 :  Now Double click  on setup Icon on the  Desktop .You will see.


    Step 20 : Now Enter the required field and click  Submit Button.You will see.


    Step 21 : Now Click Show Table Data Button.You will see.